Tuesday, December 31, 2013

Long Phung Vietnamese Restaurant - Joo Chiat


Have you ever had a love-hate relationship with a city or a country? I did and still have. I've been to Ho Chi Min once for a short work trip and the memories left of the city were serious air pollution that left me nosebleeds, massive traffic with difficult-to-cross roads, purchases that had to be bargained at all times and cab drivers that tried to cheat on every ride we took. That was years ago, it could be different now I guess. Nonetheless, I had very good memories of the food. I love their sweet and thick coffee; 1 shot of super dark coffee dripped from the metal filter and a half cup cold condensed milk stirred into a satisfying, wake-up cuppa. I also love their Pho, especially the beef pho. Steaming hot bowls of a sweet, clear soup, with their signature thin, smooth kway teow and lots of raw beansprouts that added a lovely crunch. 

I've not visited Vietnam ever since, and heard that Hanoi is a beautiful place. It would be one of my to-visit places, for Halong Bay and for a taste of their pho again. Meanwhile, to get a fix of pretty authentic and really delicious vietnamese food, I would recommend Long Phung Vietnamese restaurant at Joo Chiat. They serve up a big variety of dishes, with a wide range of rice &  noodles dishes, as well as side dishes such as vietnamese rolls, spring rolls, chicken wings, cockles etc. Their cockles seemed really popular, with many of the tables enjoying it with a good dose of chili. 


Amongst the noodles which also has flavors such as duck, shrimp, beef, beef brisket, we chose the chicken for me and the beef and pork leg for the hubb. Both bowls arrived in a short while and they are full of flavors and generous in ingredients. The beef and pork leg (bottom left) has a deep, sweet aroma and tasted strongly of a broth that has been broiled for a long time to seal in the flavors. The chicken pho (bottom right) has a soup that also has a sweet undertone but a little lighter by comparison, which means I could drink most of it; it's pretty addictive, whereas the beef and pork soup could be a tad heavier to finish. The crunchy beansprouts lend a good texture to the dish and there was so much chicken that I felt there was more meat than pho, not that I'm complaining. It's a very satisfying bowl!


We also tried the quintessential Vietnamese Rolls. Wow. while Nam Nam is also one of my favourites, I'm afraid it has to stand aside. These Long Phung rolls are fantastic. They are big and fat! You can see the prawns clearly through the thin yet study but still soft and chewy skin; there were slices of pork that added a savory note and the vermicelli was smooth and silky. The mint was also clearly detected and I'm not a fan of mint leaves but this combination somehow blew me off and I woofed down 2 rolls greedily. Oh, not to forget that the accompanying sauce was the icing on top of the cake. It was luxurious, with a good dose of peanuts that added an extra crunch as you chomp into the rolls. Simply lip-smacking good. We almost ordered another plate; lucky the noodles arrived then! 


As for the environment, I would say it's more an eatery than a restaurant - clean and simple, with many waitresses taking and serving orders efficiently. The whole experience can be completed in half an hour as you want to get your slurps done and vacate your seats for the poor souls queuing outside. Do go early to avoid long queues. We reached at 6pm and could be seated immediately. When we left at 645pm, there was a snaking queue though it's a working Monday night. Go get your fix!


Long Phung Vietnamese Restaurant
159 Joo Chiat Road
Singapore 427436

Sunday, December 29, 2013

Chinatown's Hong Kong Mongkok Dim Sum - Best Char Siew Bao

Best Char Siew Bao in Singapore! That's the opinion of my 2-man household which is not statistically accurate by any measure but definitely proven, by our happy tummies and nodding heads. The char siew is tender and coated in a thick, sweet sauce. The bao part is fluffy and soft, such a delicious package that you can eat at least 2 at 1 go. They are priced reasonably, at 3 for $2.30 and they are not the super small 2-bite size types typically found in the bao chains; these are at least 5 bites for a girl, somewhat similar to a child's fist in size. 

These are baos from "Hong Kong Mongkok Dim Sum", a stall found on the 2nd floor of Chinatown Complex Market. It's a stall where it's specialty is Char Siew Baos, much raved about from many food bloggers. They only sell 6 items, which are pictured clearly on the top, below the signboard. It's a clear case of quality over quantity. Thumbs up!

It's opened from 11am; hubby and I were there at 1030am hoping they will open early. No luck. We then observed others picking up these number cards from their stall though the metal gate is still half down. So while we were probably the earliest, 3 others picked up a card before we decided to follow suit. 

Aaaah, we understood the reason when the stall finally opened, at 1110am. There's a number system and you order your food when your number blinks. The auntie will then serve your food immediately before the system calls the next number. Kind of fast food concept style. Very efficient and very fast!


The baos are best eaten on the spot as the 3 baos get a little squished in the styrofoam box and they get  a little lopsided so the filling leaks out when steamed again at home. Having said that, do pack a few home for breakfast the next day, you wouldn't get sick of this and a little leakage and flat baos do not deflate the enjoyment index much at all.  

Other than the drool-worthy char siew baos, we tried both the prawn chee chiong fun and char siew chee chiong fun. The prawns were generously found through the whole rolls and the rice rolls themselves were slightly chewy and very smooth, very nice! The char siew here is a tad on the dry side though. 


If only they have a chilli with more kick, that would have completed our mini dim sum meal just nicely. By the way, I dabao 9 char siew baos and all were happily gobbled up by the family! 

335 Smith Street
#02-097
Chinatown Complex Market
From 11am onwards

Saturday, December 28, 2013

Christmas Log Cake


I usually do 1 log cake a year and this year is no exception. I made my first and only log cake order for X'mas and maaan, I intend to keep it that way. It's way too stressful trying to roll up the cake carefully and without cracking. My first cake broke totally into pieces as I was rolling it up, together with my heart! Rolled up my sleeves abit further, wiped my cold sweat and started all over again, with a different recipe though. This time I used a japanese recipe and I was a little hesitant at its call for baking at 200C. Phew, thankfully it turned out smooth, spongy and soft. After a short cool down period, I was able to roll up the cake slowly, steadily and with just 1 teeny weeny small crack that was easily sealed up by the ganache. Since it was for an order I didn't get to try the cake with the whole bananas wrapped in it but I did try the cut-away corners of the roll which I dipped generously in the chocolate ganache. I must say it's pretty good, soft and bouncy, with a hint of honey fragrance. Yum!


Swiss Roll Recipe:
Ingredients:
50g AP Flour
15g Cocoa Powder (I used Hershey's)
6 eggs, separated
100g sugar
30ml honey (I used Australia honey)
20g Unsalted butter
30ml milk (I used Meiji Skimmed Milk)

Oven temp 200C.

1. Sift the flour and cocoa powder together 3 times and set aside
2. Place the egg yolks, 40g sugar and honey into a mixer bowl and over a bain-marie, stirring constantly until the mixture is warm to the touch.
3. Immediately beat the yolk mixture until it turns creamy and pale. (Ribbon stage)
4. Set the yolk mixture aside and beat the egg white until frothy.
5. Add 60g sugar to the egg white and beat until stiff peaks.
6. Fold in half of the stiff egg white into the egg yolk mixture. Fold in all the sifted flour mix.
7. Add the remaining egg white and fold in lightly.
8. Warm the butter and milk in the microwave for 20seconds, add into the mixture and fold in completely, scooping from the bottom of the bowl to ensure a thorough mix. Be careful not to deflate the mixture.
9. Pour mixture into a rectangular pan lined with baking paper. (I used the pan that comes with the oven) Smooth the top and bake in pre-heated oven for 10 to 12 minutes. (mine took 11minutes) The top of the roll should not have a crust and feels bouncy to the touch.
10. Remove from oven and taking the roll from the pan, drop it onto the tabletop to release the steam and prevent a wet cake. Let the cake cool to almost room temperature.

Filling - I used a chocolate swiss meringue buttercream, refer here for the recipe, and 2 big ripe bananas.

Frosting - Chocolate Ganache
Bring 200ml thickened cream to almost a boil, where there are little bubbles but it has not reached a boiling state. Immediately pour this over 200g chopped dark chocolate pieces and stir until it has become a thick chocolate liquid mix. Let it cool until it's just warm, stir occasionally so that the surface would not harden.

Assembly:
1. Flip the cake so that its facing top-down on a new piece of parchment paper. Remove the parchment paper from the bottom of the cake and gently roll the cake up without squeezing it too tight.
2. Unroll the cake and spread the chocolate swiss meringue buttercream evenly across the cake (the bottom side which is now the side facing up). Place the whole bananas across the length of the cake and roll up the cake again, making it tight this time. Ensure that the cake sits on the sealed part.
3. Place the cake into the fridge to set for an hour.
4. Remove from the fridge, and place parchment paper around the exposed cake board to collect spillover frosting. Cut away a small section from the 2 ends of the cake to make it even at the sides.
5. Pour the ganache generously across the whole roll, covering every part of the cake. Cut out 1 section from one of the ends to create the broken log effect and place this side-ways up on top of the cake. Cover this section and the 2 ends of the roll with more ganache. Place X'mas decor as desired and place it back in the fridge to chill.
6. Once the ganache has set on the cake and is pretty stiff, use a fork to draw little lines across the whole log to create the bark look.
7. Serve slightly chilled but not straight cold from the fridge. (This is to ensure the cake has soften slightly)

Submitting this to:
"Baby Sumo's Christmas Recipes Collection 2013", hosted by Baby Sumo of Eat Your Heart Out
and 
"Bake Along", hosted by Joyce from Kitchen FlavoursLena from Frozen Wings and Zoe from Bake For Happy Kids


Monday, December 23, 2013

Gingerbreadman Video

Christmas is a time for gifting! It's so joyous to see loved ones and family members smile in happiness when receiving their presents. The gift need not be very big nor expensive, it's definitely the cliche "It's the thought that counts" So why not roll up your sleeves and make little gingerbreadman for everyone?

It's also normally a yearly break and each year I scratch my head, trying to recall how I did it the year before. So this year, we did a home video of the steps! Let this be a record that I can refer to yearly and this can be a little guide to others as well!


Gingerbreadman Recipe:
a. 455g plain flour
b. 2 tsp cinnamon

c. 2 tsp ground ginger
d. 1/2 tsp ground nutmeg
e. 1 tsp sea salt
f. 1/2 tsp baking soda
g. 117g unsalted butter, room temp
h. 100g brown sugar
i. 50g fine grained white sugar
j. 150g molasses (I used dark molasses)
k. 2 small eggs, cold
l. 1 tsp vanilla extract

Steps:
1. Combine ingredients a - f and sift.
2. Using the paddle attachment, cream butter, brown & white sugar on high speed until pale & fluffy.
3. Add molasses and cream for another 2 minutes.
4. On medium speed, beat in eggs and vanilla.
5. On low speed, add flour mixture until fully combined. Dough will be soft and mallable but not sticky nor crumbly.
6. Separate dough into 2 portions, cling wrap and refrigerate for at least 2 hours. 

When ready to bake:
1. Preheat oven to 175g, fan mode.
2. Roll out 1 portion of the dough onto a floured tabletop. Use only a light layer of flour on the tabletop and try not to get it on the top surface of the dough. 
3. Cut out shape of your choice, peel shaped doughs from surface and place it onto a lined baking tray.
4. Bake for 13 minutes, turning the pan around 7min into the bake. 

5. Cool completely before icing it. 

Royal Icing Recipe:
2 Egg Whites
1 tsp lemon juice
2 cups icing sugar

Add lemon juice to egg white and beat slightly. With the mixer on high speed, add sugar 1 cup at a time. Beat until stiff peaks. 
If texture is too grainy or stiff, add a little water to thin it. If texture is too runny, add more icing sugar and beat further.
Cover and use quickly as it will dry up if exposed to air.
 Customise according your friends' name to put a big smile on their face!

Thursday, December 19, 2013

Swiss Meringue Buttercream Cheese - finally a pipe-able batch!


Cream Cheese Frosting! How many of you are like me? I surfed countless recipes, tried many times and tasted plenty, in the search for a tasty one that can hold swirls. The cream-cheese-butter-icing sugar recipes usually turned out pretty good for frosting and are able to hold with lots of icing sugar incorporated but are way too sweet for my liking. From various feedback, I gathered that Swiss Meringue Buttercream is well-liked for it's lightness and satiny mouth-feel.

I've done it twice before, it's indeed tasty but was a little slippery to work with. I find it easy to frost cakes with it but they are not stiff enough to hold shape. Today, I whipped up yet another batch of Swiss Meringue Buttercream Cheese (SMBC), however I made a big booboo. I did not let the cream cheese soften and didn't whip the cheese sufficiently before I added the buttercream. The end result was a frosting that had little icky bits of cream cheese. Eui, not nice on the palate. Darn, I had 300g of cream cheese and 600g of SMB in it! All wasted. So I went to Mr. Google on "how to save a lumpy cream cheese frosting" and that's how I knew I made the 2 big mistakes. Most remedies call for microwaving the SMBC for 10s then rewhipping. I tried, microwaved, whipped, chill, didn't work. I tried again, microwaved longer, whipped, chill, turned into ab absolute goopy mess. Thats when I concluded that I tried but failed. Tough work. 900g of frosting went into the trash.

But, the blessing in disguise came! While waiting for my 2nd batch of cream cheese to soften at room temperature, I left my SMB in the fridge to chill. As I later whipped the cream cheese till the cows came home, scrapping down and whipping repeatedly till it's smooth, I added the cold SMB bit by bit till the CC and SMB are just incorporated together. That's when I realised to my pleasant surprise that the peaks held. Wow, I think the cold SMB could be one of the key factors. The other factor could be that lower proportion of cream cheese to SMB. In my previous attempts, I used 70 to 80% ratio of CC to SMB, this time I used only 50%. The cream cheese taste is still pretty significant, enhanced further by a tablespoon of lemon juice.  So 2 factors that changed my frosting from a creamy but slightly droopy frosting to a light and stiff buttercream that can be piped, were the cold buttercream and the lower proportion of cream cheese. I may try 60% CC to SMB next time, just to see if there's any significant difference in taste and texture.

Meanwhile, go make yourself a cake that needs that Swiss Meringue Buttercream Cheese!


SMBC: (Makes around 750g SMB)
5 large egg whites
250g granulated sugar
340g unsalted butter, softened and cut into cubes
2 teaspoons vanilla bean paste or essence
pinch of salt
375g cream cheese, cubed and at room temperature

Steps:
1. Place egg whites and sugar in a clean and dry metal mixer bowl, and simmer over a pot of water (not boiling), whisking constantly but gently until the sugar has completely dissolved and the egg whites are hot.
2. Using the whisk attachment of mixer, immediately start whipping until the meringue is thick and glossy. The mixture should be at room temperature by now (It may take around 10 minutes)
3. Switch over to paddle attachment and on low speed, start to add butter cubes gradually, and mix until it has reached a silky smooth texture. Add vanilla and salt.  Continue to beat on low speed until well combined.
4. Move the SMB to another bowl and keep that in the fridge. 
5. In the mixer bowl, paddle-whip the soft cream cheese till it's light and smooth. Took around 15 minutes of high speed paddling and lots of scrapping down the bowl. 
6. Add bits of the cold buttercream to the whipped cream cheese on med-low speed until it's just incorporated. Add a tablespoon of lemon juice, paddle-whip at med-high speed for a short while to let it come together. TaDa! It's now ready to be used. 

Wednesday, December 18, 2013

Chocolate Banana Pictorial Guide

Chocolate Banana is a popular choice for birthday celebrations. It looks like the pairing of sweet ripe bananas and a moist dense chocolate cake is good for all ages. Since I've started selling my bakes in late October, this is by far my most ordered cake or cupcakes! Like to really thank everyone for the support by providing a pictorial guide to assembling this cake. You can use this as a loose guide in making a lovely cake for your loved ones and you could also use your own favorite chocolate cake and frosting recipes.

Step 1 -Bake the cakes

I used my favourite chocolate cake recipe, from the Pioneer Woman! It's an easy, fuss-free recipe, I will usually also whip up a batch of cupcakes, everyone loves a hidden banana, not so hidden now but will be covered by a frosting swirl later. 


Chocolate Cake
Ingredients:
227g unsalted butter
4 heaped tablespoons cocoa powder
1 cup boiling water
2 cups All-Purpose flour
11/2 cups fine-grained white sugar (300g)
1/4 teaspoon fine seasalt
165ml buttermilk (Which I sub for 150ml Meiji Milk and 15ml of lemon juice, let stand for 10minutes)
2 large eggs
1 teaspoon baking soda
1 teaspoon vanilla essence

Pre-heat oven to 175C, top-bottom.

Steps:
1. Melt the butter in a large saucepan over medium fire. Swirl it constantly, until it reaches a slightly browned stage.
2. Add the cocoa powder and let it melt within the butter. This would start to look very thick.
3. Add the boiling water and stir to combine. Let it come to a boil and boil for about 30seconds. Remove from the heat and let it cool slightly while you prepare the rest of the ingredients.
4. In a large bowl, combine the flour, sugar and salt and whisk to combine and aerate it slightly.
5. In a measuring cup, measure out the buttermilk, add the eggs and vanilla essence, stir to combine.
6. Add the cocoa mixture to the flour mixture, stirring quickly and thoroughly to let it come together into a  thick, sticky paste.
7. Add the baking soda to the buttermilk mixture, stir briefly and pour everything into the cocoa-flour paste. Stir vigorously to combine the mixtures and it will become a pretty liquid batter.
8.1. For cupcakes, spoon them into cupcakes cases, drop a sliced banana chunk into each cup if you'd like and bake them for 18 to 19 minutes, turning the pan around at 13 minutes.

8.2. For whole cakes, I prefer to do 1.25 portion of above recipe, divide them equally into 2 lined 8-inch pans, and baked for 40 minutes. I've tried 1 portion and 1.5 portion size before, I find 1.25x just the right height after slicing off the slight domed top.

It's a very tender cake, so cool them totally before removing it from the pan and be very careful at it or they may break into pieces.

Step 2 -Level the top of the cakes

I used 6 satay sticks and stick them in all around the cake at an even height from the bottom up. Place a serrated knife on 2 sticks at a time and gently slice into the cake, moving from stick to stick until the cake has been sliced in round the circumference. Remove all the sticks if they had not already fallen out by now, and slice through the center. Remove the sliced tops and go ahead, eat 'em all up, they are frequently the best parts of a cake!


Step 3 - Make Butterscotch Sauce and Cook the Bananas

This step is pretty optional. You can just use riped, sliced bananas and sandwich the cake layers together with the frosting of your choice. I like to use butterscotch sauce as it lends a buttery fragrance to the bananas which also releases their aroma upon cooking. The sauce is also thick and sticky enough to act as the glue between the cake layers. 


I usually use a large plate which is similar to the size of the cake and cut enough bananas to cover the plate as an estimate for the amount of banana slices needed. Note that they will shrink a little upon cooking so do have some extra on hand. They turned a beautiful bright yellow after cooking.

Butterscotch sauce:
180g thickened cream
160g brown sugar
150g unsalted butter
1 tsp vanilla extract
1/2 teaspoon sea salt

Place all ingredients in a pot and bring to boil. Simmer at low heat for around 5 minutes, constantly stirring the mixture until it thickens. 


This will make a large batch. Leave enough sauce in the pan to cover the amount of sliced bananas (Approx. half cup) and keep the rest in a jar to cool and keep for up to 2 weeks in the fridge. Place thickly-cut bananas into the sauce and simmer, flip over, simmer until the bananas just turned slightly soft. This should take a couple of minutes only. Do not cook them for very long or they may become too mushy. 

Step 4 - Sandwich the cake layers with the butterscotch bananas. 

Place 1 cake layer on the actual serving cake board, leveled side facing upwards. Arrange the cooked banana slices on top, placing them close together so every bite yields a large mouth of bananas. 


Next, drizzle the remaining sauce over the bananas. 


Lastly, place the 2nd cake layer, bottom facing up onto the banana slices. Press the cake down firmly to stick it to the sauce. 


Now, leave the cake in the fridge for the butterscotch and bananas to cool and the cakes to stick together. Ooh look at how the sauce dripped and pooled. A sticky sweet mess. 


Step 5 - Frost the cake with Chocolate Swiss Meringue Buttercream (SMB)

Once the cake has sat in the fridge for around 1 hour which will have the cake layers and bananas stuck together quite nicely, the frosting can go on. I always try to make a large batch of SMB so that whenever I need them, I take the amount needed from the freezer, defrost in the fridge overnight and whip to a smooth cream before using. 1 batch of SMB (5 egg white) can make around 2 8-inch or 40 cupcakes. However, if the middle of the cake uses SMB instead of butterscotch, then 5 egg white would only be enough for 1 cake with a little left over. 

Chocolate Swiss Meringue Buttercream 
5 large egg whites
250g granulated sugar
340g unsalted butter, softened and cut into cubes
2 teaspoons vanilla bean paste or essence
pinch of salt
200g melted and cool dark chocolate

Steps:
1. Place egg whites and sugar in a clean and dry metal mixer bowl, and simmer over a pot of water (not boiling), whisking constantly but gently until the sugar has completely dissolved and the egg whites are hot.
2. Using the whisk attachment of mixer, immediately start whipping until the meringue is thick and glossy. The mixture should be at room temperature by now (It may take around 10 minutes)
3. Switch over to paddle attachment and on low speed, start to add butter cubes gradually, and mix until it has reached a silky smooth texture. Add vanilla, salt and melted chocolate. Continue to beat on low speed until well combined.


Before frosting the cake, do place little pieces of aluminium foil or baking paper beneath the cake, just slightly tuck them under the circumference of the cake and make sure it covers the cake board. This is so that any excess cream will drop onto the foil and can be easily pulled out after the cake is frosted, leaving the cake board clean. I find that easier than trying to wipe the board clean thereafter which still usually leaves it looking oily. (Note: do not use kitchen towels as they get soaked and sticks under the cake.. you don't want guests biting into pieces of leftover kitchen towel! eeeui)

Place the cakes on a turntable (Ikea has the best reasonably-priced ones, at $19.90 and is a good size!) and frost away! For a good video tutorial, check out my absolute favourite lady "Sweetapolita.com". She's superb with frosting and has so many good and creative ideas! I've used a number of her recipes and they have all been easy to follow, with good results. 

Once done, leave the cake in the fridge again to set for another hour. 

Step 6 - Finishing Chocolate Glaze

Before putting on the final touch to the cake, start by placing the whole cake in the freezer. As the chocolate glaze has to be slightly warm to be pourable, the cake has to be frozen so that the buttercream would not melt on contact with the glaze. For cupcakes, I will freeze them for 15 minutes and for whole cakes, half an hour at least. Meanwhile, make the glaze!

Chocolate Glaze:

Ingredients:
50g dark chocolate, chopped into pieces (I used 70% cocoa)
100ml heavy cream

Steps:
1. Simply melt the dark chocolate and cream together in a bowl set over simmering water. Do not let any water or vapor get into this mixture. 
2. Cool slightly to a temperature just warm to the touch and use immediately.  
3. Pour the glaze generously over the top of the cake until they reach the circumference and gently nudge the glaze so that it glides over the side. 
4. Place it back into the fridge to set for the last time, until time to serve. 

It's best to remove the cake from the fridge for around 20 minutes to let the buttercream and cake soften a little as they can be a little hard when too cold. 


Thursday, December 12, 2013

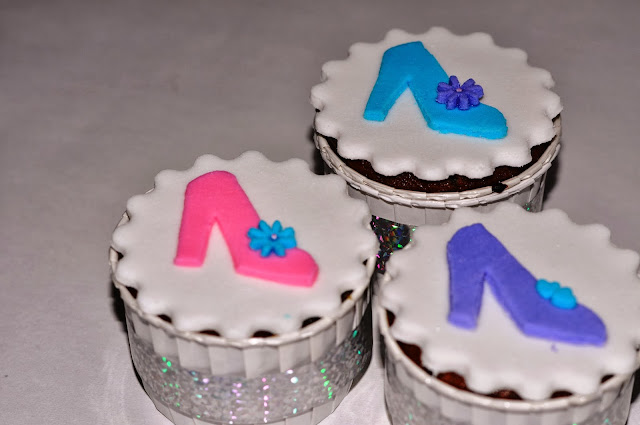
Sticky Date Cupcakes with high heel fondant toppers

Dec is a month of celebrations and eating. Thanks to support from many friends and through referrals, my baking orders are pretty packed this month. It's especially happy and uplifting when I get good feedback on my bakes being enjoyed. Love it that comments frequently mentioned are that the sweetness level is just right. My frequent reduction in sugar seems suitable for the local palette! 

Sent off a Sticky Date cupcakes order today, it's for a birthday and the lady who ordered it wanted high heel fondant tops. Ta da, here's my again-amateurish fondant toppers. I used fondant from Red man and mixed in a fair bit of modelling gum, made the toppers 1 day before to let it dry out. I wanted to keep the toppers hard and lightly adhere them to the cupcakes with a teeny bit of butterscotch sauce so that these fondant pieces can be lifted easily and discarded. I never approve of anyone eating these fondant; it's preserved sugar and loads of colouring only!

Yay, just got feedback that the birthday gal likes these cakes! *made my day!*

 Added a splash of glittery silven ribbon to glam them up a little!

 Love these quirky mini cards!


Monday, November 25, 2013

Chocolate Sponge Cake with Butterscotch Popcorn, Walnuts and Honey Flakes

Hands up! Who loves Garrett's Pop Corn?

10000 hands out of 10001 will probably be raised. Me.. I was never a popcorn fan, with my teenage movie dates subjected to soggy (aka Lao Hong) popcorn, limited to either sweet or salty in flavors. So, when Mr. G. popcorn appeared in the Singapore scene, I was not interested. Total L.A.G.G.A.R.D that I was, it was probably 1 year or so later when I had my first bite at a friend's place. Man.... I fell in love. Those caramel-coated macadamia nuts, the how-does-it-stay-so-crispy popcorn are simply finger licking additive, as most people and the long queues can attest to.

That was the inspiration for this post. I love having textures in my cakes, especially a crispy layer to accompany a soft and moist cake. What better way than to have a bite of cake with a mouthful of crispy popcorn, nuts and cereal. I wanted the crisps to be the highlight of the cake, therefore piling them high up on the cake which tantalises the eyes in addition to sweetening the tongue. Indeed, I thought the look was pretty appetizing, with layers of chocolate whipped cream and a glaze seemingly oozing from the nutty mix.


However, my thoughts didn't literally translate into reality. I popped the buttered popcorn, mixed them with a generous portion of walnuts and cornflakes, coated them with a light layer of butterscotch sauce and sent them into the oven to bake for 20 minutes. To the top of my chocolate sponge cake they went, piled high like a crown.

The nuts and flakes baked to a golden crisp beautifully.. crunchy and aromatic. The popcorn was another story; still as listless as the usual microwaved popcorn, in other words, kinda Lao Hong. My first foray into the world of corn didn't pop.. but oh well this experiment tells me that walnuts and cornflakes go beautifully together. I'm already envisaging another cake, maybe a salted caramel cake, with caramel-coated walnuts and corn flakes.

Chocolate Sponge Cake (Source)
3 Eggs
75g sugar
45g cake flour
10g cocoa powder
pinch of salt
30ml warm whipping cream (microwave high at 20s)

Oven 180C, 2x6inch cake pan, lined on bottom. 

Steps:
1. Sift cake flour, cocoa powder and salt together
2. Whisk eggs in a mixer on high speed until it lightens in colour.
3. Add the sugar to the egg mixture and mix on high speed until it reaches the thick ribbon stage (Where the batter will flow from the beater in a thick lava layer)
4. Add the flour into the egg-sugar mix and fold in to just combine. 
5. Take 1/4 of this mixture and stir into the warm whipped cream. 
6. Pour the whipped cream mixture into the rest of the batter and fold to combine 
7. Pour into pan, tap on the counter to remove air bubbles and bake for 18 - 20 minutes, when the top is slightly browned and spring back to your touch. Cool completely. 

Chocolate Whipped Cream
300ml heavy cream
1/4 cup sifted icing sugar
100g melted and cooled dark chocolate

Steps:
1. Place the mixing bowl and beater into the freezer 15minutes before whipping the cream. (This helps to accelerate the whipping process and prevent curdling)
2. Whip heavy cream on high speed until it reaches a creamy state
3. Add the icing sugar and mix on high speed until it is stiff and in a whipped state
4. Add the cool chocolate and gently beat in on low speed until it's incorporated (Alternatively, fold the chocolate in but be careful not to let the cream curdle)
5. Keep in fridge until ready to frost the cake

Chocolate Glaze 
Ingredients:
50g dark chocolate, chopped into pieces (I used 70% cocoa)
100ml heavy cream


Steps:
Simply melt the dark chocolate and cream together in a bowl set over simmering water. Do not let any water or vapor get into this mixture. Cool slightly to a temperature just warm to the touch and use immediately.  

Walnuts-Popcorn-Cornflake Mix
Ingredients:
1 cup of popped popcorn
A fist of walnuts
1/2 cup of honey cornflakes (I used Nestle Honey Flakes)
1/4 cup of butterscotch sauce

Steps:
1. Pop the popcorn and let it cool slightly
2. Mix the popcorn, walnuts and cornflakes together and coat them with butterscotch sauce
3. Bake at 175C for 20 minutes but stir occasionally to prevent burning
Note: My popcorn didn't turn crispy so I would suggest to omit the popcorn or trial and error other ways of making them crunch.

Assembly of Cake
1. Sandwich a layer of chocolate whipped cream between the 2 layers of sponge.
2. Frost the outside of cake with the chocolate whipped cream and leave in the fridge for an hour to set. 
3. Before pouring the chocolate glaze, freeze the cake for 15minutes to prevent the chocolate glaze from melting the cream. When ready to pour, remove the cake from the freezer and pour the slightly warm chocolate glaze over the top, nudging the sauce around the edge of the cake to let it flow over. 
4. Pile the nut-mix on top of the cake and chill the cake for another 30minutes to let the glaze set. 

Serve slightly chilled. 

Monday, November 18, 2013

Girly Sugar Cookie Pops

This is my first attempt at making decorated cookies with fondant. It's for a little girl's gift to her classmates, therefore the theme of girl characters. I'm never good with decor, preferring to perfect the cake's taste and texture, playing around with fillings and frosting to enhance the flavors, relying on premises of rustic (aka home-style and far from store-bought) for decor.

I tried one time with royal icing, mixing a thick and thin icing, flooding the cookie, piping shapes and OMG, what a nightmare for me and my clumsy fingers. Flooded area looks grainy, faces are definitely not round and piped eyes look more halloweeny drippy than sweety big.

16 cookies later, I g.a.v.e. u.p.

Packed everything and have my nieces and nephews have a go at it, with an impromptu cookie decor session that they thoroughly enjoyed and were able to give as little presents to their kindergarden classmates.

Back to my cookies, I've an order to deliver...so once again, Mr Google and it's family of many helpful, passionate bakers came to my rescue. There were plenty of techniques videos, cookie tips and inspirational pictures, both with royal icing and fondant. I conclude that I can probably work with fondant after having done an Angry Bird fondant cake before.

On to the adventure I went, baking the cookies a night before and printing lots of little girl pictures for reference. I referenced the cookies from Sweetapolita, my favourite site for decor ideas, she's uber inspirational. The cookies tasted really great. The shapes stayed and I added a fair bit of orange zest, giving it a fruity essence as you crunch into it. The only little bit of challenge was in determining the thickness of cookie and timing needed to ensure its crunchy but not burnt. I had batches that look nicely baked but it was not as crispy as a sugar cookie pop needs to be as it has to stay on the sticks. Finally determined that a nice timing was 25 minutes for my cookies which will have a slight browning at the edges but nicely crisp and tasty upon cooling. Perfect for a cookie pop!


Cookie Recipe: (source)
Ingredients (makes around 25 to 27 large round cookies)
227g unsalted butter, cold and cubed
200g fine white sugar
1 large egg, cold
375g plain flour and 1/2 teaspoon salt (sifted together)
2 teaspoon vanilla essence
zest from 2 mid size oranges

Steps:
1. Cream the butter and sugar together until light and fluffy with the paddle attachment.
2. Beat in the cold egg.
3. On mid speed, add the flour and salt and let it mix until just combined.
4. Add vanilla essence and orange zest and let it incorporate.
5. Take 1/2 the dough and  mix into a ball on a piece of parchment paper. Cover with another layer of parchment paper and roll it out to the thickness desired. Do the same with the rest of the dough. Refrigerate for at least 45 minutes.
6. Remove 1 tray at a time and cut out cookie shapes, lay on baking tray lined with paper. Place them back into the fridge and let it firm up for another 30 minutes.
7. Once the cookie shapes are chilled, gently insert the stick up to the middle of the cookies. At this point, place them into the freezer and start the oven at 160C.
8. 15 minutes later, slide the cookies straight from freezer into the oven, bake for 13minutes, flip the tray and baker another 12 minutes. Edges should be slightly brown, top should still be beige in colour whilst the bottom of cookie would be light brown.
9. Remove from oven and let it stay on the tray to cool before removing. It is still a little soft when straight out from the oven so removing it from the tray may break them.
10. Cool completely before starting the decor.


To decorate the cookies, let them cool completely and ensure it's dry and crispy. Colour the fondant in desired colours by kneading them with the colours until well blended. Place coloured fondant under wrap at all time to prevent drying out. Take out bits of fondant as needed, roll them out on a surface dusted with icing sugar and cut shapes out. Dab a teeny weeny bit of water of the back of the fondant and adhere them to the cookie.

Let cookie and fondant dry totally before packing them into cute little bags as gifts!